

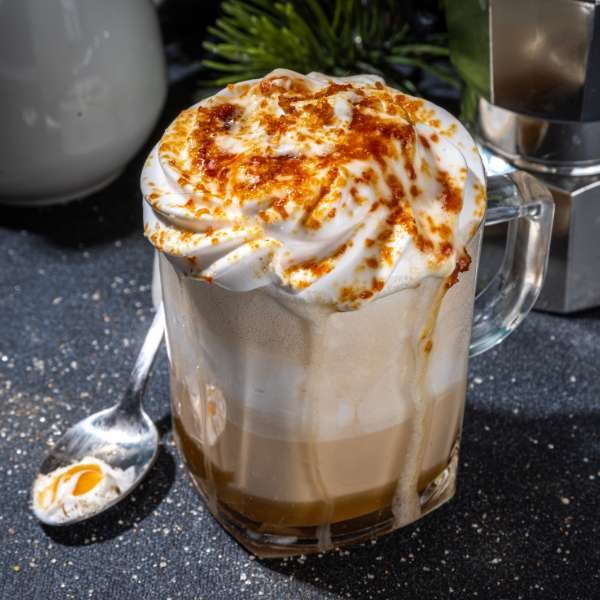
Ah, the joy of coffee—a daily ritual for many, but what truly transforms an ordinary cup into something extraordinary is the addition of a luscious caramel coffee syrup. Picture this: the smooth, indulgent blend of rich toffee and velvety cream swirling in your cup, enveloping your senses in warmth and sweetness. Doesn’t it make your morning coffee feel like a decadent treat? But here’s the secret: you don’t have to settle for the store-bought stuff. Making your own caramel coffee creamer is simpler than you might think. And once you try it, you’ll wonder why you ever bought the pre-made version.
There’s something profoundly satisfying about controlling every aspect of your coffee creamer’s flavor, sweetness, and texture. When you make it yourself, you can experiment, perfecting the balance until it’s just right. No more mysterious ingredients and artificial additives—just pure, unadulterated goodness, customized exactly to your taste.
Store-bought creamers often contain long lists of preservatives and chemical additives, but making your own means you can keep things clean, authentic, and real. Plus, you get to skip the hassle of worrying about artificial aftertastes. It’s time to elevate your morning routine with a creamer made fresh from your kitchen!
Understanding the Basics of Coffee Creamer
Before diving into the details of how to make caramel coffee creamer, it’s important to grasp the fundamental concept of coffee Whipping cream itself. At its core, espresso creamer is designed to do one thing: enhance your coffee by providing a creamy, flavorful boost. Unlike regular milk or cream, coffee creamers tend to be much thicker, providing a richer consistency that elevates the drink into something special.
There are two primary types of coffee creamers: dairy and non-dairy. Dairy creamers, made from milk or heavy cream, offer a luxurious mouthfeel and a rich flavor. They’re often enhanced with added sugars to sweeten the deal. Non-dairy creamers, on the other hand, come from plant-based ingredients like almond or coconut milk, perfect for those avoiding dairy or seeking a lighter alternative.
Both types have their merits, but what’s wonderful about homemade Whipping cream is that you can use whichever base best suits your dietary needs or flavor preferences. It’s all about creating the ideal experience for your morning cup.
Essential Ingredients

Making Caramel coffee syrup at home doesn’t require a pantry full of exotic ingredients. In fact, with just a few simple staples, you can craft a flavor-packed whipped cream that’ll make your coffee taste like a café creation.
- Sweetened Condensed Milk: The Secret Ingredient Sweetened condensed milk is the muse of your whipped cream. This thick, syrupy concoction is concentrated and sweetened, providing each the creamy texture and the important sweetness. It’s the magic factor so as to deliver your homemade whipping cream its signature smoothness and rich taste. It’s the shortcut to making your coffee indulgent with out overwhelming it with excessive sugar.
- The Role of Heavy Cream in Toffee Coffee Whipping cream Heavy cream is another vital player on this recipe. It adds the velvety, rich mouthfeel that makes Caramel coffee syrup so impossible to resist. The thick consistency of the cream helps create that luxurious, easy texture that coats your espresso with just the proper amount of richness, making each sip sense like a mini party.
- Why Brown Sugar Adds the Perfect Flavor When it involves caramel, brown sugar reigns very best. Its molasses undertones supply a deeper, greater complex sweetness than white sugar ought to ever provide. Brown sugar is the key to unlocking the genuine Toffee flavor to your espresso creamer, infusing it with a warm, toasty sweetness. Plus, it contributes to the creamy consistency that makes your homemade creamer so easy and inviting.
- Choosing the Right Toffee Flavoring Now, here’s where the magic happens. You’ll need to add the caramel flavoring that will bring your espresso creamer to life. While homemade caramel sauce gives the creamer a rich, deep flavor, you can also opt for store-bought caramel syrup or extract if you’re in a pinch. But nothing beats the full-bodied taste of freshly made caramel—it truly adds that “wow” factor.
Step-by-Step Guide
You’re a fan of sweet and creamy iced coffee, this step-by-step guide on how to make iced coffee caramel and how to make caramel coffee creamer will elevate your coffee experience. Start by brewing a strong cup of coffee, then let it cool completely. In the meantime, make your caramel coffee creamer by combining sugar, butter, and heavy cream in a saucepan, heating until smooth. Once the caramel has cooled, pour it over the iced coffee for a rich, indulgent flavor. Add your homemade caramel coffee creamer to taste, stirring gently for the perfect balance of sweetness and creaminess. It’s easy to prepare and will leave you enjoying a deliciously creamy iced coffee with every sip!
Step 1: Mix the Sweetened Condensed Milk with Heavy Cream.
In your saucepan, pour in the sweetened condensed milk and add the heavy cream. Stir them together gently to combine. This is your base, and it should have a rich, smooth consistency right from the start.
Step 2: Dissolve the Brown Sugar
Next, add the brown sugar. Keep stirring it over low heat, ensuring the sugar dissolves completely into the milk and cream mixture. The goal is to avoid any grainy texture, so be patient—let the sugar blend seamlessly with the cream, creating a smooth, silky base.
Step 3: Adding Caramel Flavoring – Homemade vs. Store-Bought
Once your sugar has dissolved, it’s time to bring in the Toffee flavor. If you’re using homemade Toffee sauce, about two tablespoons should be perfect. For store-bought Toffee syrup or extract, start with a teaspoon and adjust according to your taste. The more you add, the richer the flavor, so feel free to experiment until you find your ideal balance.
Step 4: Simmering and Stirring the Mixture
Lower the heat and bring the mixture to a gentle simmer. Stir continuously to prevent the Whipping cream from burning or sticking to the pan. As the mixture simmers, the flavors will blend together, and it will begin to thicken. Let it simmer for about 5-10 minutes, or until it reaches your preferred consistency.
Step 5: Cool and Store
After the mixture has thickened, remove it from the heat and let it cool completely. Transfer it into an airtight container or bottle and store it in the fridge. It will stay fresh for up to two weeks—if you can resist finishing it sooner!
Tips for Perfecting Your Caramel Flavored Coffee Creamer

How to Adjust the Sweetness to Your Taste
The creamer is a bit too sweet for your liking; you can reduce the brown sugar or caramel flavoring. Alternatively, if you like it sweeter, feel free to add a little more sugar. The beauty of homemade creamer is that you can adjust it to perfection.
How to Make Your Caramel Coffee Creamer Thicker or Thinner
Want a thicker Whipping cream? Simply add more heavy cream or simmer the mixture longer to reduce the liquid. For a thinner version, just add a little milk or water once the creamer has cooled. Feel free to adjust the texture to match your personal preference.
Using Real Caramel vs. Caramel Extract
While real Toffee sauce adds a complex, rich flavor, caramel extract can be a convenient alternative for those who don’t have the time to make it from scratch. Extracts are more concentrated, so a little goes a long way, but they may not offer the same depth of flavor as homemade caramel.
Flavor Variations for Caramel Flavored Coffee Creamer

Adding Vanilla for a Richer Taste
To enhance the flavor, stir in a teaspoon of vanilla extract into your Caramel coffee syrup. Vanilla and Toffee are a match made in flavor heaven, creating a beautifully balanced, sweet, and aromatic whipped cream.
Add a Dash of Cinnamon or Nutmeg for Extra Flavor
A warm, comforting touch, try sprinkling in a pinch of cinnamon or nutmeg. These spices not only add warmth to the flavor, but they also elevate the caramel, making it even more comforting.
Salted Caramel Twist: How to Add Salt for Extra Flavor
A delightful sweet and salty contrast, try adding just a pinch of sea salt to your creamer. The salt enhances the caramel’s depth, giving it a sophisticated flavor profile that’ll make every sip memorable.
Storing and Using Homemade Caramel Coffee Creamer

How to Store Your Homemade Caramel Flavored Coffee Creamer
Store your homemade creamer in an airtight container, and keep it in the fridge to maintain its freshness. Before each use, give it a good shake, as it may separate over time.
How Long Does Caramel Coffee Creamer Last?
Your homemade creamer can stay fresh in the refrigerator for up to two weeks. Ensure you check for any signs of spoilage before using it.
Best Ways to Use Your Caramel Coffee Creamer in Coffee
Add a few tablespoons of your homemade caramel creamer to your freshly brewed coffee. Stir it in for a creamy, sweet boost. You can also experiment with using it in iced coffee or frothy lattes!
Creative Ways to Use Your Caramel Coffee Creamer in Desserts
Don’t just stop at coffee—use your creamer in desserts like ice cream, puddings, or cakes. It’s a versatile ingredient that brings a rich, Toffee flavor to a wide range of sweet treats.
Troubleshooting Common Issues When Making Caramel Coffee Creamer

Why Your Caramel Coffee Creamer Might Be Too Sweet (and How to Fix It)
Your creamer turns out too sweet, dilute it with some more heavy cream or milk. You can also reduce the sugar in your next batch or increase the Toffee flavoring for a less sugary result.
How to Prevent Your Caramel Coffee Creamer from Separating
To prevent separation, stir the mixture well while heating it, and make sure to store it in an airtight container. Shaking the container before use will also help keep the mixture consistent.
What to Do if Your Caramel Flavored Coffee Creamerr is Too Thin
Your Whipping cream turns out too thin, return it to the stovetop and simmer it for a bit longer. You can also add a bit more cream to thicken it up or even use cornstarch to help.
Healthier Alternatives to Traditional Caramel Coffee Creamer

How to Make a Low-Sugar Caramel Flavored Coffee Creamer
Swap out some of the sugar for a low-calorie sweetener like stevia or monk fruit. You can also reduce the amount of brown sugar and let the Toffee flavor take center stage.
Dairy-Free Options for Your Caramel Flavored Coffee Creamer
You prefer a dairy-free version, substitute the heavy cream with coconut, almond, or oat milk. These alternatives offer a similar creamy texture without any dairy.
Using Alternative Sweeteners like Stevia or Monk Fruit
A sugar-free choice, try using stevia or monk fruit. Both sweeteners can provide the desired sweetness without the calories—just be sure to adjust the quantities to suit your taste.
Frequently Asked Questions:
Can I Use Non-Dairy Milk for Caramel Flavored Coffee Creamer?
Yes! Almond milk, oat milk, or coconut milk can all be used as dairy-free alternatives. While the texture and flavor may differ slightly, they’ll still provide a rich, creamy addition to your coffee.
Can I make caramel coffee syrup without brown sugar?
Brown sugar isn’t your thing, white sugar or sugar substitutes will work, but the flavor profile will be different. You might miss that rich, molasses undertone, but the creamer will still be delicious.
Is Homemade Caramel Flavored Coffee Creamer Better Than Store-Bought?
Absolutely. Homemade Caramel coffee syrup gives you the freedom to adjust the flavor and texture to your liking, while also ensuring it’s made with real ingredients. No preservatives or artificial flavors—just pure, fresh goodness.
Conclusion
Making your own caramel espresso creamer is more than just a fun DIY project—it’s a way to personalize your coffee experience and indulge in something truly special. Whether you enjoy it extra sweet, spiced, or even with a salty twist, the versatility of homemade Caramel coffee syrup ensures that every cup is just the way you like it. So, what are you waiting for? Brew that coffee, pour in your whipping cream, and savor the rich, comforting taste of homemade luxury in every sip.